
YJ의 새벽
Java Script ( window 내장객체 , 팝업창 ) 본문
- window 객체
-- 브라우저 창 자체를 나타내는 객체
-- window 객체는 JS에서 최상위 객체이며 , DOM , BOM 으로 분류된다.
DOM ( Document Object Model ) : HTML 문서 자체를 나타내는 객체 ( document )
BOM ( Browser Object Model ) : location , history , screen , navigator ( 페이지의 이동 )
-- window 객체는 창 자체를 나타내고 있으므로 , 브라우저 창 내에서 어디서든 접근 가능 .
window 객체의 속성과 기능 호출시 window 단어 생략 가능 .
ex ) window.alert () == alert ()
-- 시간 관련된 함수는 비동기 !
( 코드인식은 순서대로 진행되지만, 수행은 동시에 진행 . )
- window. setTimeout ( 함수, 지연시간(ms) ) -비동기
-- 지정된 지연시간 후 함수를 실행하게 만드는 window 객체함수.
-- window.setTimeout() 에서 this 는 window 객체를 말함.
<button id="btn1">setTime() 확인용</button>const btn1 = document.getElementById("btn1");
btn1.addEventListener("click",function(){
// 0 초
this.style.backgroundColor="red";
// 2 초 후 orange
window.setTimeout(function(){
btn1.style.backgroundColor="orange";
},2000);
// 4 초 후 yellow
window.setTimeout(function(){
btn1.style.backgroundColor="yellow";
},4000);
// 6 초 후 green
window.setTimeout(function(){
btn1.style.backgroundColor="green";
},6000);
})
- window. setInterval ( 함수,지연시간(ms) )
-- 지정된 지연 시간마다 함수를 수행. ( 첫 실행도 지연시간 후에 실행 )
    <div id="clock">00 : 00 : 00</div>
    <h2>window.clearInterval(setInterval()이 저장된함수)</h2>
    <button id="stop"> STOP </button>
// 현재시간 반환하는 함수
function currentTime(){
//현재시간 저장하고있는 객체 생성
const now = new Date();
let hour = now.getHours();
let min = now.getMinutes();
let sec = now.getSeconds();
//얻어온 시간값이 10 미만일경우 앞에 0 추가
if( hour < 10 ) hour = "0" + hour;
if( min < 10 ) min = "0" + min;
if( sec < 10 ) sec = "0" + sec;
return hour + " : " + min + " : " + sec;
}
// 페이지가 로딩되자마자 #clock 에 현재시간 출력
const clock = document.getElementById("clock");
clock.innerText = currentTime();
// #clock에 1초마다 현재시간 출력하도록하는 코드작성
const interval1 = window.setInterval(function(){
clock.innerText=currentTime();
},1000)
//STOP
document.getElementById("stop").addEventListener("click",function(){
window.clearInterval( interval1 );
})window.clearInterval(setInterval()이 저장된함수)
- window.open( "URL" , "팝업창 이름" , "팝업창 특성(옵션)" )
***URL
-새 창에서 요청할 URL
***팝업창 이름
- 사용자 임의 지정 : 새 창 이름 지정
- _blank : 새 탭 또는 새 창(기본값)
- _self : 현재 탭 또는 현재 창
- _parent : 부모페이지
- _top : 최상위 페이지
***팝업창 특성(옵션)
- 쉼표로 구분된 창 기능 목록을 포함하는 문자열 name=value또는 부울 기능의 경우 name.
이러한 기능에는 창의 기본크기 및 위치, 최소 팝업 창을 열지 여부 등과 같은 옵션이 포함됩니다.
- popup 최소한의 팝업창 사용 팝업 창에 포함된 UI 기능은 일반적으로 주소 표시줄만 포함하여
브라우저에서 자동으로 결정됩니다. 활성화 popup되지 않고 창 기능이 선언되지 않은 경우
새 탐색 컨텍스트는 탭이 됩니다.
- width 또는innerWidth 스크롤 막대를 포함하여 콘텐츠 영역의 너비를 지정합니다.
최소 필수 값은 100입니다.
- height 또는innerHeight 스크롤 막대를 포함하여 콘텐츠 영역의 높이를 지정합니다.
최소 필수 값은 100입니다.
- left 또는screenX 새 창이 생성될 사용자의 운영 체제에서 정의한 대로
작업 영역의 왼쪽에서 픽셀 단위로 거리를 지정합니다.
- top또는screenY 새 창이 생성될 사용자의 운영 체제에서 정의한 대로
작업 영역의 위쪽에서 픽셀 단위로 거리를 지정합니다.
- 팝업창 열기
    <button id="openPopup1">팝업창 열기1</button>
    <button id="openPopup2">팝업창 열기2</button>
    <button id="openPopup3">팝업창 열기3</button>
//팝업창 열기
const openPopup1 = document.getElementById("openPopup1");
const openPopup2 = document.getElementById("openPopup2");
const openPopup3 = document.getElementById("openPopup3");
openPopup1.addEventListener("click",function(){
// 새탭에서 열기
window.open("https://www.naver.com/");
})
openPopup2.addEventListener("click",function(){
// 최소한의 팝업창 형태로 열기
window.open("https://www.naver.com/","_blank","popup");
})
openPopup3.addEventListener("click",function(){
//옵션이 지정된 팝업창
// " K=V , K=V , K=V " , 크기단위작성x (px 고정)
const options = "width=400 , height=500, top50, left=400";
window.open("https://www.naver.com/","popupWindow",options);
})
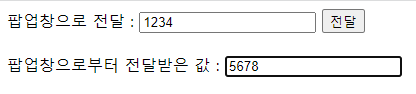
- 팝업창으로 데이터 전달하고 받아오기
---------------------------- 부모 html ----------------------------
   팝업창으로 전달 :
    <input type="text" id="parentInput">
    <button id="sendChild">전달</button>
    <br><br>
    팝업창으로부터 전달받은 값 :
    <input type="text" id="result" readonly>
// 팝업창 ( 자식 ) 열기
document.getElementById("sendChild").addEventListener("click",function(){
const options = "width=400 , height=500, top50, left=400";
window.open("팝업.html","popupWindow",options);
})
---------------------------- 자식 팝업 html ----------------------------
    <h3>팝업창입니다</h3>
    <h4>부모로부터 전달받은 값 : <span id="result"></span></h4>

    부모창으로 전달 :
    <input type="text" id="childInput">
    <button id="sendParent">전달하고 닫기</button>
const result = document.getElementById("result");
// 부모창을 나타내는 객체 : opener
const parentValue = opener.document.getElementById("parentInput").value;
// 자식 result 에 부모값 대입
result.innerText=parentValue;
//--------------------
//부모창으로 값 전달 .
const childInput= document.getElementById("childInput");
const sendParent= document.getElementById("sendParent");
sendParent.addEventListener("click",function(){
opener.document.getElementById("result").value = childInput.value;
//현재창닫기
window.close();
})

'WebFront_ > Java Script' 카테고리의 다른 글
| Java Script ( 노드(Node), 요소(Element) 탐색 ) (0) | 2023.03.02 |
|---|---|
| Java Script ( 객체, JSON ) (0) | 2023.03.02 |
| Java Script ( 형변환, 연산자, 배열 ) (0) | 2023.02.28 |
| Java Script ( 정규표현식 ) (0) | 2023.02.27 |
| Java Script ( 이벤트 ) (0) | 2023.02.24 |


